Running WSL2 on a Mac using Bootcamp

Brief Summary
The steps are:
- Boot into MacOS
- Run
sysctl -a | grep machdep.cpu.featuresin the terminal to ensure your mac has virtualization. - Boot into Windows from System Preferences. You MUST do it this way. You cannot power off and boot into Windows.
- Disable decompression on the folder that contains your linux distribution.
- If windows ever restarts, make sure first boot into Mac and repeat step 3.
Step-by-Step Instructions
Enabling Virtualization
Disclaimer: I've tried this on a 2015 16-inch MBP, and a 2017 13-inch MBP. If it doesn't work for you, let me know.
After installing WSL2, you may be greeted with the following cryptic error:
Installing, this may take a few minutes...
WslRegisterDistribution failed with error: 0x80370102
Error: 0x80370102 The virtual machine could not be started because a required feature is not installed.

Press any key to continue...
You'll get this error when you mac hardware doesn't support CPU virtualization, which is odd because most macs since 2010 certainly do support it. It turns out that this feature needs to be enabled by the BIOS, and can only be enabled on the MacOS side. So you may run into this error, for example, if you've booted into windows from power-on.
To fix this, boot into MacOS, open a terminal, and run sysctl -a | grep machdep.cpu.features. Ensure that you get a response from that command (You should see "VMX" in the response. That is the hardware feature you need).
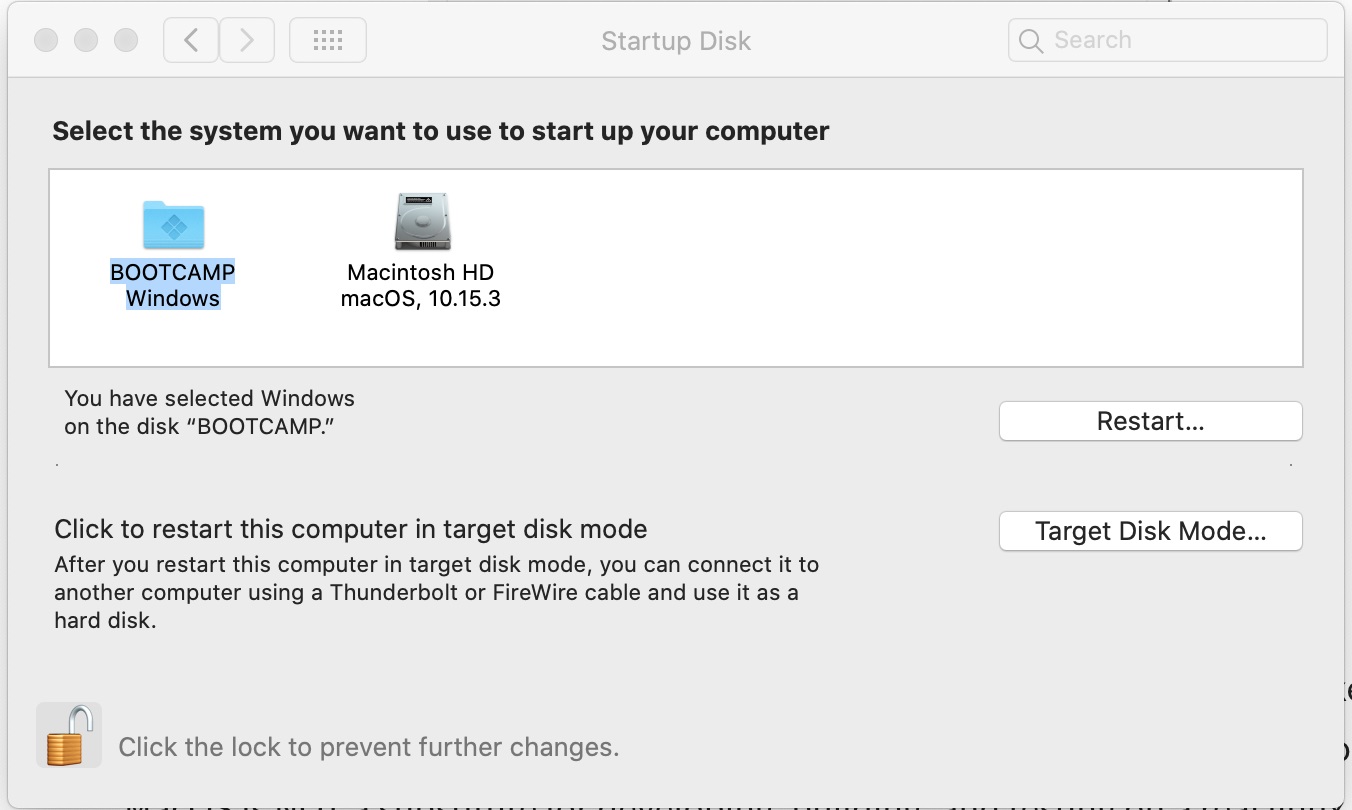
Once you do that, you need to boot directly into windows by going to System Preferences > Startup Disk and boot into windows by selecting your Bootcamp partition. By booting into Windows directly from MacOS, the virtualization feature that you need for WSL2 will be enabled.
 Select your Bootcamp partition and click the "Restart" button.
Note that this specific step of going to system preferences, and then to your Bootcamp partition, is absolutely required. Do NOT simply reboot your machine and select your windows partition at boot! If you do so, then it's possible that the virtualization feature you need won't be enabled in Windows.
Note that if you restart windows, you may need to repeat this process over again (i.e. boot into MacOS, System Preferences > Boot Into Windows).
Disable Compression
You may ALSO get another cryptic error:
The requested operation could not be completed due to a virtual disk system limitation.
Virtual hard disk files must be uncompressed and unencrypted and must not be sparse.
To fix this, you need to disable folder encryption and folder compression on the folder where your linux subsystem is installed. Mine was installed at: C:\Users\myusername\AppData\Local\Packages\CanonicalGroupLimited.UbuntuonWindows_79rhkp1fndgsc
Once you find it, right click on the folder, go the "General" tab, click on "Advanced" and make sure that both checkboxes are the bottom are unchecked.
After doing this, you should be good to go!
Why Run WSL2 on Mac?
You might be asking yourself this question when macs themselves are unix-like environments. Well, the term "unix-like" should give the answer away: in my opinion, MacOS is NOT a substitute for developing, building, and testing on a real linux distribution. If your target platform is a mac, then great, write all of your code and build scripts on a mac. But if your target platform is linux, much of the code you've written to build out and maintain your environment (i.e. install libraries, configure databases, etc) will not be portable to your actual application servers. Whereas if you use a linux platform all the way through, the portability of your code increases. Your development environment buildout code will never be 100% portable, but I'd argue that the closer you can get your development environment to your actual application servers, the better.
So why not just install a linux VM on Mac? Well, aside from the brief snags mentioned above, I think WSL2 is a far more pleasant (and cheaper, i.e. free) experience than anything like virtualbox or parallels on mac. WSL2 even integrates natively with IDEs like VScode (which is an amazing experience, which I use to develop this website).
Comment Policy: no flamewars or trolling. Just have fun and be nice!
